welcome!
  • blog
  • about me
  • ravelry
  • instagram
  • contact
  • blog
  • about me
  • ravelry
  • instagram
  • contact
welcome!

Kaity B Fraker

some favorite things...

2/16/2016

0 Comments

 
I sort of just recently remember that I had a blog. I love posting on Instagram and the community of friends I've made over there, but I find myself wishing I could blab about my knitting in a longer form. My husband can only feign interest for so long! One afternoon as I was knitting I was thinking how if would be nice to talk about the things I was making or had finished, my thoughts on certain yarns, whatever, and it dawned on me "Duh Kaity, you have a semi-defunct blog".

I have no idea how often I will post, maybe once a year like I'm known to do, or maybe more often? I also don't know if anyone will read this, but it feels good to do some writing and babbling about my favorite hobby :)

Today I just want to highlight some of my recently finished projects that I am particularly fond off. I made this little baby sweater for my niece for Christmas.

Rinnie's Christmas Sweater

Picture
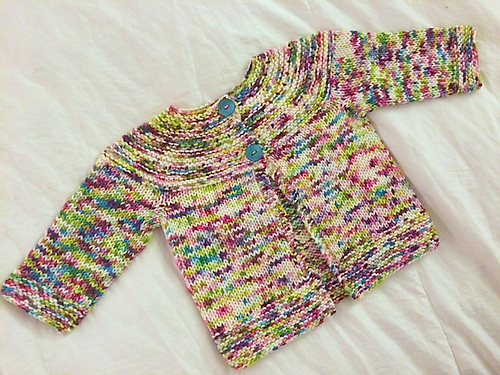
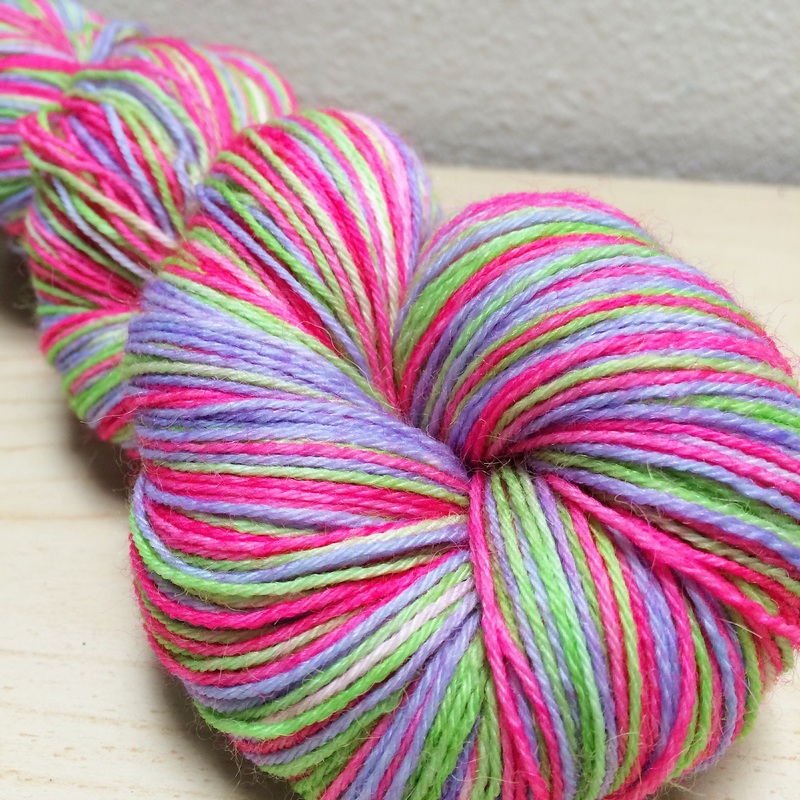
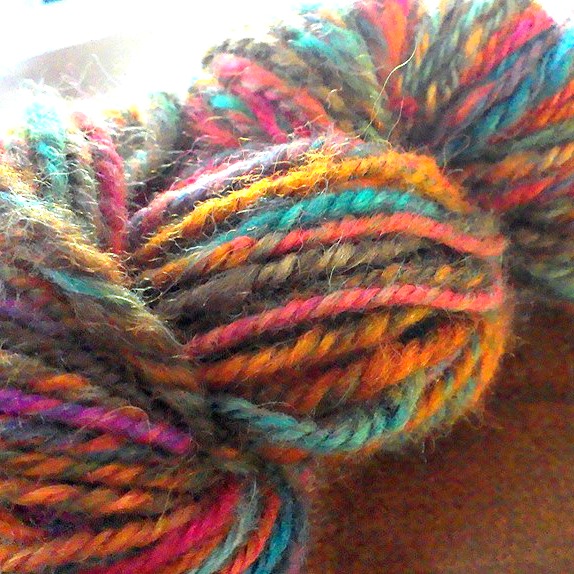
I just loved how it turned out, and it looks really cute on her, if I do say so myself... When this yarn (Knitted Wit Victory DK) came into the shop, I thought this colorway (Fairy Garden) was so sweet, and this project was a real joy to knit. This pattern used up the whole skein of yarn, with maybe a few inches to spare. I knit the body, then divided what yarn I had left in half to make each sleeve as long as possible. 

Trego

Picture
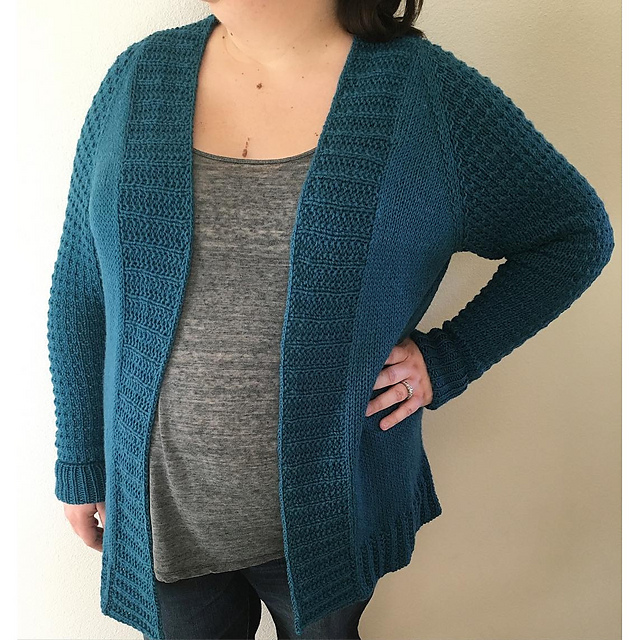
When my husband gave me a gift certificate to the yarn store where I work for Christmas, I knew I wanted to get enough yarn for a sweater for myself. I hardly ever knit sweaters for myself because I have a really hard time staying committed. The fact that the gauge for this pattern was 16 stitch to 4 inches made it a quick knit, and I finished it in a little less than a month! I am so proud of myself, and I love this sweater to pieces. I love the textured sleeves, I love the yarn, I love the color, I love the length, it's pretty darn close to perfect. Too bad a few days after I finished it, Southern California decided it was summertime in mid-February, hopefully someday soon I'll be able to wear it again.

Beeswax

Picture
Picture
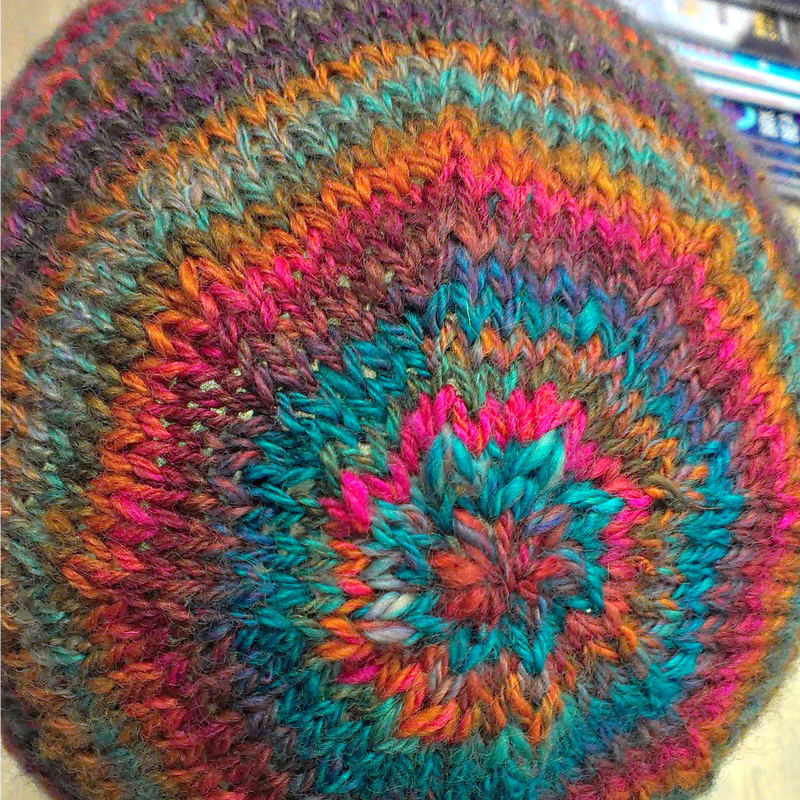
This hat was one of those projects that really impressed me. I know I'm a good knitter, and I have been knitting for over 10 years, but every once in a while I seem to impress myself. This pattern was so fun to knit, and I immediately want to cast on another one. Also, let's take a second to talk about this yarn. I used Anzula Cricket, which is a DK weight blend of Merino and Cashmere. I loved every stitch, the definition is perfect, the yarn was spun to the perfect amount of "bounce" and this color is killer. I love this project so much. 

That's all for today, I just felt like putting something out there. I'll try to post more often, but again, who knows? Follow me on Instagram to see more up-to-date posts :)
0 Comments

Dyeing Self Striping Yarn with Food Dye

2/27/2015

4 Comments

 
Picture
Last week I posted this photo on my Instagram page of some yarn I had dyed with food coloring and had some interest in how I did it, so today I am going to be sharing my process. There are a lot of photos in this post, but dyeing yarn with food coloring is very simple! In this tutorial I am dying a self-striping sock yarn, but you could use these same principals and dye any weight of yarn, and in any arrangement. If your skein of yarn came in a basic hank, you could just pour the dye over it in sections and make an awesome variegated skein!

Let's start off with what we need:

Picture
-Yarn (I'll talk about this a little more in a second)
-Food Coloring
-White Vinegar
-Microwave safe jars (I think mine are 1 Quart Ball jars, I picked these up at Target for about $1.50 a piece)
-An old Towel
-Plastic cutlery (not necessary, but it makes it easier)
-Optional: Gloves and an apron to protect your skin and clothes from becoming stained. I don't use any gloves because I like to live on the edge.
Picture
As far as yarn goes, you are going to need an animal fiber based yarn. Wool, alpaca, superwash wool, anything like that. The yarn I am dyeing today is Lion Brand Sock Ease. I picked this ball up at Michaels for around $6 with a coupon. It's 75% wool and 25% nylon. I don't know much about dyeing nylon or why it works, but all I know is that it does. I haven't experimented much with other percentages of nylon to wool, but most sock yarns with nylon only have up to 25% and that will work for dyeing with food coloring. You could dye any size yarn, from fingering weight to super bulky, the sky is the limit!

Picture
For the colorant, I usually use these Wiltons Icing colors. They are a gel food coloring that come in lots of colors and are easy to find at most craft stores with a baking department. Again, I got these are Michaels and they run around $2.30 a bottle. You don't have to use these, but I like them for their range of colors. You could use this same process with those liquid food colors you can pick up at the grocery store that have the little droppers on the ends.

Picture

This next step will take a little math. I want a self striping yarn to knit socks with. I want my stripes to be approx. 4 rounds wide, and I'm going to be using 3 colors when I dye it. Through a little testing, I've figured out that I need about 24" of yarn to knit one round of a sock with 64 stitches on my usual US Size 1 needles. With all that knowledge, I can figure out how long of a skein of yarn I need to make this happen. 3 colors X 4 rounds per color = 12 rounds for one color repeat. 12 rounds X 24" in a round = 288" for one 3 stripe sequence. That means I need to wind my ball of yarn into a long skein that measures 288" around. I spaced out 2 chairs and wound my yarn around them to make my big ol' loop of yarn.

Picture


Take some scrap yarn and tie your skein in a few places to ensure it doesn't get tangled during the dyeing process. I usually tie it in 4-5 places. Make sure you don't tie it too tight or you will get white spots in the yarn where the color couldn't penetrate.

Picture


Take your skein and separate it into three equal length loops. I usually do this by draping it over my hand and adjusting the loops from the bottom until they are all about the same length.

Picture


Now lay your skein out with the center of all of your loops in the middle, with each loop pointing out in a different direction. Tie them together at the top to keep them separated.

Picture


Gently place your skein into some warm water to soak for a few minutes while you make up the dye baths. To the warm water, add about 1/2 a cup of the white vinegar. This is what will make your colors more colorfast.

Picture


Put your jars into a microwave safe pan or something that will make them more easy to move in and out of the microwave. I use a 9X9" Pyrex. Fill them about 3/5th of the way up with hot water (I use the hottest water that comes from the tap). Then add vinegar to each jar, until they are about 2/3rds full. I don't measure anything when I do this, I just eyeball it. After you have filled your jars, put them in the microwave and heat them for about 3 or 4 minutes, so the water is hot, but not boiling or anything.

Picture
Picture
Open up your food coloring. Today I am using Orange, Teal, and Burgundy. Once the jars are done heating up, it's time to add the dye. I usually stick the end of a plastic knife or something like that into the dye, and then swirl it around in the jar.
Picture
Picture
I usually add dye and then take a scrap of my yarn I'm dyeing and dunk it into the dye bath. This will give you a rough idea of how the color will turn out. Add as much dye as you want to get the color you want. I'm sometimes surprised by the colors I get, and it takes a little trial and error to perfect this process.
Here's a picture of my dye baths once I tested and decided on the colors:
Picture
Take your yarn out of the water it's soaking in and squeeze the excess water out, just so it doesn't drip. Drape each loop into the dye baths, one in each. Top off the jars with more hot water so it's full to the top.
Picture
Picture
Picture


Once I've topped off the jars I take the white parts of the yarn that aren't submerged and dip them into the dye so I don't end up with too many white bits in the finished yarn.

Picture
Pop your jars in the microwave and nuke them for 4 minutes. I alternate between heating the yarn for 4 minutes and letting it sit and soak up the dye for 4 minutes. 4 minutes heating, 4 minutes resting.

Repeat the process until the water in the jars is mostly clear. As you can see in the picture on the right, the water in some of the jars isn't totally clear, but enough color has soaked into the yarn to get it the color I want.
Picture
Picture
Let the yarn sit and cool for a few minutes before the next step. It will be hot, so be careful! I use tongs to pull the yarn out of the dye baths and into the sink. Then, I use warm water and rinse the yarn multiple times. Each time I make the water a little cooler, until it's cool enough to handle. Then I continue to rinse and squeeze water out until the water runs clear.
Picture
Picture
Squeeze out the excess water and lay your yarn out in the towel. Wrap it up and press as much water out as you can. Then I use a few hangers and hang it up to dry.
Picture
Picture
Once your yarn is dry, you can wind it into a more manageable skein or ball. I space the chairs out again and wind it around my niddy noddy (I made mine out of PVC pipe pieces from Lowes for under $5)
Picture
Picture
Ta-da! Your very own custom dyed self-striping sock yarn! Now go off and knit some awesome socks!
Picture
4 Comments

Socks Socks and More Socks

2/14/2014

0 Comments

 
Hello there everyone! It's been a while! Since last time I've posted, I have been spending my free knitting time (or which I seem to have very little these days!) knitting socks, socks, and more socks.

I love knitting socks, firstly because they are fun and fast to knit, and secondly because everyone loves them! I happily knit socks for people who appreciate them, because I know they will wear them. My husband loves the hand knit socks I've made him (and I should really make him more pairs, he deserves them) and my sister told my this past Christmas that she really would like new socks, she wears hers all the time.

I have semi-officially determined 2014 as my year of sock knitting. My goal is to make a pair for every month of the year. I don't have any strict rules or anything, but I would love to stock up my sock drawer with more hand knit socks. Here's the socks that have fallen off my needles since I last posted here.
Picture
These socks I knit with some handspun. I loved the colors of this yarn, but being a itchy scratchy wool, I knew It had to be socks. I don't feel the itchyness on my feet, and I think these socks will be nice a hearty, and wear for a long time.

Yarn: Handspun Navajo Churro 2 Ply. Spun from roving from SkyIslandGirls on etsy.

Needles: US Size 5 magic loop.

Pattern: Toe up, gusset heel

Picture
These warm, cozy boot socks got a lot of wear last November, when I spent the weekend in a couple feet of snow with my family.

Picture
These were my sister's Christmas present. I had this yarn in my stash for a while and my sis loves pink, so it was the perfect match!

Yarn: Paton's Kroy Sock 4 ply in "Mulberry Stripes" - 2 balls

Needles: US Size 2 DPNs

Pattern: Basic Cuff-Down Heel Flap socks over 60 stitches.

Picture
This sock is a sample for the upcoming class I am teaching on basic sock knitting. I used worsted weight yarn to make for faster results, and I love the way it turned out. I'll knit the other sock along with the class.

Yarn: Malabrigo Rios in "Purpuras" - 1 skein

Needles: US Size 4 magic loop.

Pattern: Basic cuff-down heel flap over 44 stitches.

Picture
When this yarn came into the shop, I HAD to have it! Neon stripey sock yarn? Yes please!!

Yarn: Regia Fluormania in "Neon Ocean" - less than 1 ball.

Needles: US Size 1 DPNs

Pattern: Same as above: Basic cuff-down heel flap socks over 60 stitches.


I'll post any more progress I have in my sock-knitting endeavors soon. I have some awesome new socks on the needles right now, but I'll wait to share those when they are a little farther along. :)

0 Comments

Keep on Spinning

11/7/2013

0 Comments

 
I wanted to share a picture (or two, or three) of the finished hat from yesterday's post. Here she is:
Picture
I love the finished project, I love the colors, I love everything about it! I just used a simple basic hat pattern (size 8 needles, 80 stitches, 2x2 ribbing for 8 rounds, knit straight for 5.5 inches, decrease at 8 points on the top) and it was a quick, simple knit. Here's a few gratuitous close-ups:
Picture
Picture
I just couldn't stop after I finished this one, I bought some merino roving and dyed it with some Kool-aid:
Picture
I used Peach Mango, Lemonade, Blue Raspberry, Strawberry-Kiwi, and Grape. Pictured above is half of the roving, the other half is already on the bobbin!
Picture
There was a bit of white left in the roving, and when all the colors started blending together when I was spinning it came out a little more pastel, but I still like it! I'm trying to spin it somewhat even and thinly, and I think I will navajo ply again. I'll be sure to check back in here when it's finished. :)
0 Comments

Big Wheel Keep on Turning

11/6/2013

1 Comment

 
I am what you call "mulitcraftual", I like to try lots of different crafts. I always return to my love of knitting, but I do occasionally drift away for a while to experiment with something else. This week, I have been cheating on my knitting with my spinning wheel.

My little Ashford Kiwi has sat in the corner of my TV room for months and months gathering dust, until the other day when I was perusing pictures of handspun on Instagram and decided it was time to dust off the wheel and give it a go. Armed with some beautiful handdyed BLF Superwash roving I bought off of Etsy, I went to work.
Picture
I had forgotten how therapeutic and relaxing spinning is, it makes me happy. Even James was enthralled, I looked over and he was staring at the flyer spinning round and round. When I filled up my bobbin, I decided to try something new and navajo ply my singles.
Picture
I'm pretty happy with how it turned out, a little overspun in spots, and not completely even, but that's the beauty of handspun yarn, it's unique. I love that I can say that I made the yarn myself. I didn't have a ton of yardage to work with, so I cast on for a quick hat.
Picture
I'll post a picture of the hat when it's finished, I only have a few rounds left to knit!
1 Comment

Cake Decorating!

9/4/2013

0 Comments

 
Yesterday was my husband's birthday, and we are celebrating tonight with my family, so I had to make another birthday cake. He already had one a few days ago when we celebrated with our friends, but 2 parties means 2 cakes! I had seen this tutorial on Pinterest and I just knew I had to give it a go, so here are some pics that I took along the way:
Picture
As my husband is just a giant kid, I had to make a Teenage Mutant Ninja Turtle cake. TMNT are his favorite, at least 50% of his t-shirts have a turtle on them, he has entered his TMNT collection in the Fair the last 2 years in a row (and won a prize both years), and we have basically a shrine to them in our TV room. Needless to say, he likes the Teenage Mutant Ninja Turtles.

I google image searched TMNT coloring pages and found one that didn't look too complicated, good ol' Raphael over there.

Picture
With James nearby to give his opinion on colors, I went to work, starting with the outline. I used plain ol' vanilla frosting out of a can, and tinted it with Wilton cake dyes. I used a plastic zipper bag as my piping bag, and everything went really well!

You know when you are halfway through a craft project and you think to yourself "this is too easy, I'm gonna screw this up eventually, I just know it." No? Is that just me? Anyway, I totally thought this was way to good to be true, it was so easy!

Picture
Here's Raph after I finished filling in all the colors. The design I chose was a pretty simple one, so it didn't take too many colors.

James told me where to put what color, and I only screwed up one tiny spot, but no one but James will ever know!

After filling it in a stuck it in the freezer until it was hard. Like, rock hard. Seriously, if you ever do this make sure it is hard as a rock when you go to transfer it to your cake, you will make it a lot easier for yourself.

Picture
Here's the finished cake! I just used a box mix and baked it in a 13x9 pan, turned it out when it was cool, and frosted it with the plain white vanilla frosting.

I had to do a little touch up work after I took the wax paper off, it pulled off some of the design with it, so I had to go in with a toothpick and spread some frosting around to fill in the gaps. Overall, it turned out great for my first attempt, and I can't wait to try it again!

0 Comments

New Video! I ♥ Spring!

3/25/2013

1 Comment

 
1 Comment

Needle Review: Knitter's Pride Dreamz

3/22/2013

0 Comments

 
Picture
Today I want to talk to you about the Dreamz needles and other products from Knitter's Pride. Working at a yarn store, I get to try out a lot of different needles and notions, so that I can recommend them to the customers. The Dreamz needles from Knitter's Pride are my new favorite!


Here's what the company has to say about them, sourced from their website:

These needles include the Dreamz line, Cubics (cuboid-shaped) and Rose lines: All of these are made from densified laminated birch wood. This material is more costly and much harder than either ebony or rosewood. Unlike in other wooden needles, water absorption in Symfonie wood needles is negligible and, as a result, there is no chance of warping. The same property makes our needles very strong, enables the points to be sharp and provides a lifetime of pleasurable use, if handled correctly. Please remember that all wooden needles in the lower ranges (2.0mm-3.5mm) should be treated with appropriate care.
These wooden needles are fantastic! I have used the fixed circulars, double pointed, and single pointed needles. All of the ones I used have been just wonderful to use. The laminated birch wood makes these needles a good middle ground between a metal needle and a bamboo needle. Metal needles are slippery, and bamboo are really grabby, and I do use both types, just depending on what kind of yarn I'm using. The Dreamz, are right in the middle; slick and fast to knit with, but not too slippery that you'll be dropping stitches all over the place.

These have a fantastic cord as well. I hate when you get a needle and the cord kinks up on you. They say that you can soak them in hot water and that should help them relax, but that trick never seems to work for me. These Dreamz needles have the perfect cord, they are resilient, yet totally flexible. The cord is especially great for doing magic loop because they are so flexible. These needles also have great points, sharp but not too pointy, my beginning lace knitting students really like them for that reason!

The single point needles and the double pointed needles in this range are great as well, along with their crochet hooks. I like using the double pointed needles in the smaller sizes in this brand. Anything bigger than a US 8 or so I would probably use a plastic needle, just because they can get a little heavy. Heavy double pointed needles can be a problem for me, because they tend to slid out of the stitches, but If I'm using the smaller sized DPNs or the straight or circular needles, they are the perfect weight.


One thing to note with these needles is that I have seen a few customers bring them back to the shop because the wood is split. I have never had one of these needles do this to me personally, but it has happened before. If you do get one that splits, bring it back to the shop where you got it (or contact the company directly) and they will replace them for you. Again, I've never experienced this personally, but I've seen it, and it's something to be aware of.

That being said, it should not deter you from trying these out if you haven't had the pleasure already. They are also a good price, the circular needles range between about $8 and $12. The straight needle and double pointeds are similarly priced, totally reasonable for a great set of needles!

Knitter's Pride has a lot of other needles, including carbon fiber (!) acrylic, and other birch wood options. Maybe someday I'll have the pleasure to work with them, and if I like them, I'll let you know!

Thanks for reading, have a great day!

0 Comments

I like to pretend to be organized.

3/21/2013

0 Comments

 
Picture
This is my knitting bag. Well, it's one of my knitting bags. Let's be honest, you can never have too many bags. That being said, this is my newest knitting bag. I have bigger bags for carrying multiple projects, I have totes, I have drawstring project bags, but this one wins over them all.

It's technically a lunch bag, but what to do I care? When I saw it, I just had to have it, it was just too stinking cute to pass up.

It's the perfect size for carrying a smaller project, like a pair of socks or a hat, along with the pattern and some notions (like what's in my frog guy sitting there, but more on him in a minute. I usually like to have a smaller project with me when I'm on the go or at work, so I can knit in any spare time waiting in lines, or on my lunch break.

Picture
My little squirrel bag is made by a company called "Blue Q", as you can see here from the bottom of my bag. You have to go check out their website, they have the coolest stuff. I really want one of their big shopper totes for hauling my goods home from the grocery store, I may have to order myself one... Anyway, I bought mine at Copperfield's here in Ventura, Ca. If you haven't been to Copperfield's, swing by next time you are in downtown Ventura. They have some really neat old books, along with cool gifts and novelties and stuff. Definitely a fun place to spend an afternoon!

Picture
Inside my little frog are all the notions I need for knitting on-the-go (or sitting on my couch at home knitting and watching Netflix...). I've got tiny scissors, tapestry needles, point protectors, stitch markers, a tape measure, and more. I don't think they make these frog cases anymore, I bought this when I first started working at Anacapa Fine Yarns, and that was 4 years ago. They do, however, make a super cute Koala Case! You can get one here.

As far as my knitting goes, I cast on for the Loire Cardigan I mentioned in my last post, and am about 4 inches into the body. Not much progress to share, but I finally have a good chunk of knitting time tonight, and I plan on getting some work done on it!

Hope you are all having an awesome day!

<3: Kaity

0 Comments

I Just Knew.

3/21/2013

0 Comments

 
Picture
You know when you're knitting something and you just know? I mean, you know it's not working out, or it's not going to be what you want, or it's not going to fit, and you carry on anyway? I knew when I was knitting this that it wasn't going to be the sweater I had set out to knit, I just knew, but I knitted anyway.
I was excited about the idea that I could finish a sweater for myself in a week. With that goal in mind, I forged ahead and knit knit knit. This is what fell off my needles after 6 days:


Hmm. Not bad, but not good. Essentially, I wanted this to be a good go-to sweater. A basic enough style that I could throw on with lots of stuff, in a good neutral color. It just looks... blah. I know I wont wear it.

Picture


Survey Says: We've got a loser. The sleeves are too baggy, and it makes me look frumpy. Not cute. Sadly, this sweater is now in the process of being ripped.

Usually, when I knit something big like a sweater, and there's something about it that I don't like, I'll live with it a while, and maybe after a year or so, if I still don't like it, I'll fix it. But this this sweater, I just knew. I'm going to use the yarn to knit the Loire Cardigan from Webs instead. I don't know if I'll finish it in a week like this sweater, but at least I'll wear it (here's hoping!).

Anyway, I'm off to go rip out the rest of my fail.

0 Comments

    author

    Picture
    Thanks for stopping by! My name is Kaity, and I like to make stuff!

    archives

    February 2016
    February 2015
    February 2014
    November 2013
    September 2013
    March 2013

    categories

    All

    RSS Feed

Powered by
✕